The Minecraft community seems to have an obsession with doing everything on YouTube. For some people that’s great, but as someone who is already a coder and I just need to know the environment-specific details for coding for Minecraft I have a really hard time sitting through an hour of tutorial videos just to get the four things I needed to know that I didn’t already know how to do. This is where having a text and pictures version of a tutorial comes in handy, so you can skim through it looking for the parts you still need to know, and easily skip over the stuff you already know. Another friend of mine was also recently trying to get into writing a plugin for Spigot, and everything I could find to point him at which was text-based rather than a YouTube video was very outdated, had instructions that were no longer relevant because Bukkit and Spigot and Eclipse have all evolved since then, etc. So I figured I’d write one, and here it is!
Update: since writing this up, I discovered a very nice page on the Spigot Wiki documenting much of this, which seems to be mysteriously absent from the search engine searches I did trying to find this information (or at least ranked low enough that all the YouTube videos and a bunch of forum posts that skirt this issue outrank it). How to create a Minecraft/Bukkit/Spigot plugin on the SpigotMC website. I’m posting this anyway because I do a few things differently. Pick your flavor. 🙂
Setting up your development environment
Install Java
You need the Java Development Kit, not the Runtime Environment. Download the Java SE JDK from Oracle’s site. Make sure you get the JDK, not the JRE, and make sure you have the correct one for your operating system. Java.com only has JREs, you have to go to Oracle’s site for the JDK. Linux users can try installing the java-8-openjdk package.
Note for OS X users: OS X no longer ships Java by default. It will automatically install if you try to run something that needs Java, however, the version it installs is old (Java 6) and Bukkit/Spigot development requires at least Java 7, so you will need to download the newer Java even if you already have the system Java.
Download and Build Spigot
You need to link against Spigot in order to compile plugins, so you’ll need a local copy of Spigot to link to, even if you never actually run it.
Download BuildTools.jar from https://hub.spigotmc.org/jenkins/job/BuildTools/
Place it in an otherwise empty directory. Open a command prompt (or a terminal window) and navigate to the directory you placed it it. Run the following command to build it:
java -jar BuildTools.jar
This will probably take a while. If all goes well, you should get a file called Spigot-1.14.2.jar in the same directory with BuildTools.jar (the version number in the filename may be different if Spigot has been updated since I posted this). Remember where this directory is, you’ll need it later when creating the project in Eclipse.
Install Eclipse
Plugin development is done with a Java IDE. If you already have a favorite Java IDE, I imagine you can make it work, but if you don’t, I recommend Eclipse, and that’s what my instructions will be based on.
You can get Eclipse here: http://www.eclipse.org/downloads/
Most Linux distributions have Eclipse packaged already and you can probably use your package manager to install it. Your mileage may vary in getting it to work. Personally, I’ve had issues getting Eclipse plugins to work correctly because updating plugins sometimes breaks the way the packager packaged the main app, and sometimes plugins want a newer version of Eclipse (Ubuntu ships an older version), so I use a copy of Eclipse downloaded from eclipse.org rather than the one Ubuntu ships.
If you have more than one version of Java installed (OS X users, this is probably you), go into Eclipse’s preferences, click the triangle next to “Java”, and look for the “Installed JREs” section. Make sure the one you just installed is listed in there, and checkmarked. If it is not, click Add, then click on Directory to the right, navigate to where you installed the Java JDK, and find the “jre” directory inside it. On OS X, Oracle’s installer will install inside /Library/Java/VirtualMachines/. Examples:
Mac OS X:/Library/Java/JavaVirtualMachines/jdk1.8.0_31.jdk/Contents/Home/jreLinux:/usr/lib/jvm/java-8-openjdk-amd64/jre
Install a YAML editor plugin to Eclipse
The file you create that tells Spigot how to interact with your plugin is in YAML format. As shipped, Eclipse does not understand how to edit YAML files (even though it’s really just a text file). There are several plugins that will teach it how, though.
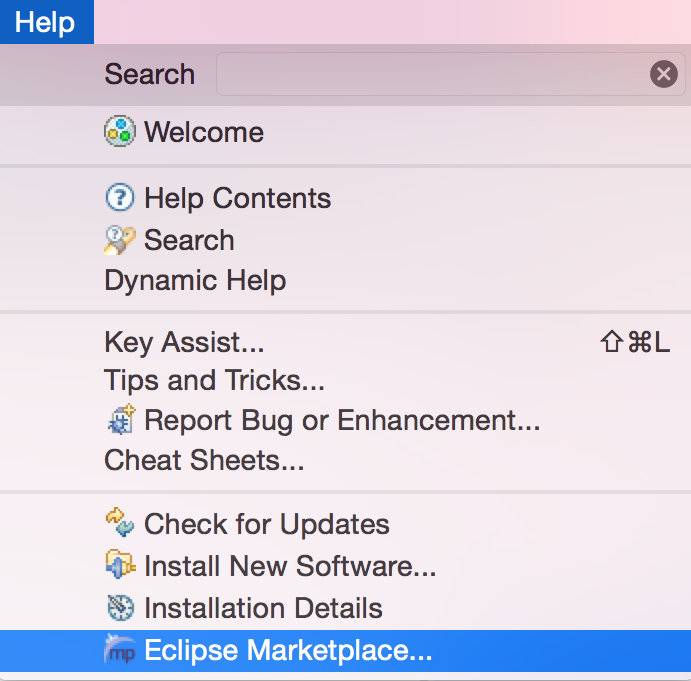
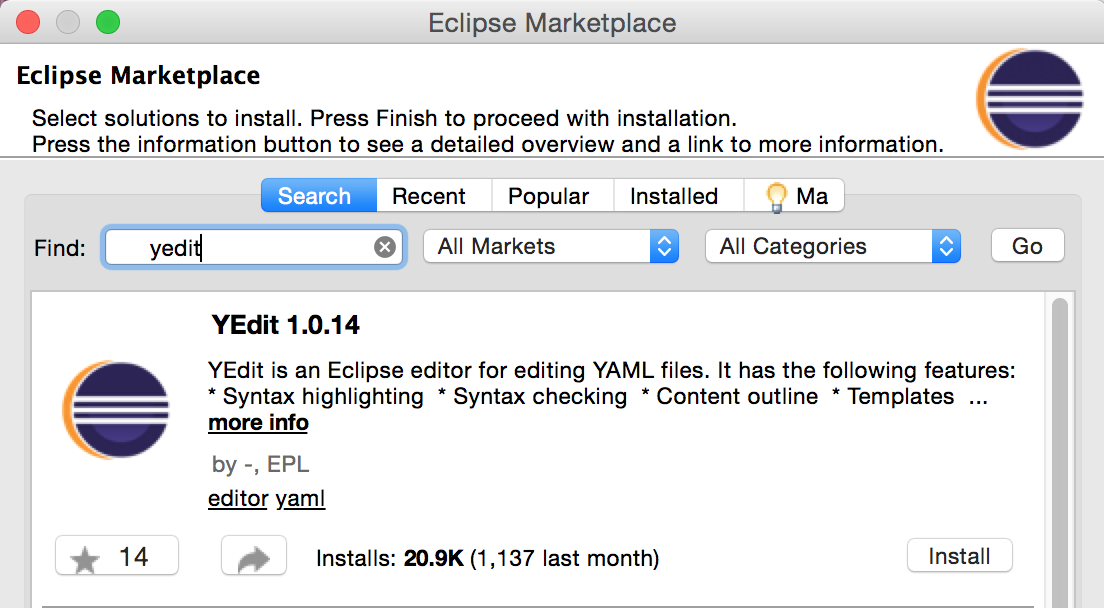
Go to Help -> Eclipse Marketplace, and type “yaml” into the Find box. There are several plugins that can do this, find one you like and install it.
UPDATE 2019/07/13: I used to recommend YEdit here (at the time I wrote this, it was the only one), but it’s gone out of the Eclipse Marketplace. There are several others available now, any of them should work.
Creating your first project in Eclipse
Create the project itself
- Choose File -> New -> Java Project
- Enter the name of your plugin
- Choose Next (not Finish)
- Click the Libraries tab.
- Click Add External JARs…
- Choose the shaded version of the Spigot-API JAR file from the Spigot directory that you compiled above. Within the directory with BuildTools.jar the API file will be in
Spigot/Spigot-API/targetand will probably be named something likespigot-api-1.14.2-R0-SNAPSHOT-shaded.jar - Toggle the triangle to the left of spigot-api
- Choose Javadoc Location
- Click Edit…
- In Javadoc location path, enter:
https://hub.spigotmc.org/javadocs/spigot/. This will allow the autocomplete in Eclipse to autocomplete Spigot API objects and methods. - Click OK
- Click Finish
Create a package
- Choose File -> New -> Package
- Enter the name of your package. This is usually structured like a domain name, but in reverse. It should start with something that identifies you, and then have the name of the project at the end, and be all lower-case. Minecraft itself is net.minecraft.server for example, Spigot is org.spigotmc, and the Bukkit plugin API is org.bukkit.plugin. I’ll use tld.example.myplugin in the examples.
- Click Finish
Create the Main class
- Choose File -> New -> Class
- Enter the name of the class which will be loaded by Spigot when it loads the plugin. You can really name this anything you want (we’ll deal with telling Spigot how to find it later), but for simplicity I’ll call it Main in the examples.
- Next to Superclass, click Browse…
- In the search box, type JavaPlugin, and choose what should be the only match (org.bukkit.plugin.java)
- Click OK
- Click Finish
It should automatically open in the editor, and you should now be looking at code that looks like this:
package tld.example.myplugin;

import org.bukkit.plugin.java.JavaPlugin;

public class Main extends JavaPlugin {

}
There are two functions defined by the API which you are required to implement. Those are onEnable and onDisable, which get run when your plugin is enabled or disabled. They don’t need to do anything, but if you have any resources that need allocating or disposed of, those are the places to do it. Add those two functions to your Main.java file, so that it looks like this:
package tld.example.myplugin;

import org.bukkit.plugin.java.JavaPlugin;

public class Main extends JavaPlugin {

    @Override
    public void onEnable() {

    }

    @Override
    public void onDisable() {

    }

}
Create the plugin.yml file
- Choose File -> New -> File
- Select the top-level folder of your project (the project name)
- for the File name enter
plugin.yml - Click Finish
It should open in the editor. If it doesn’t, you likely forgot to install YEdit up at the top of this tutorial.
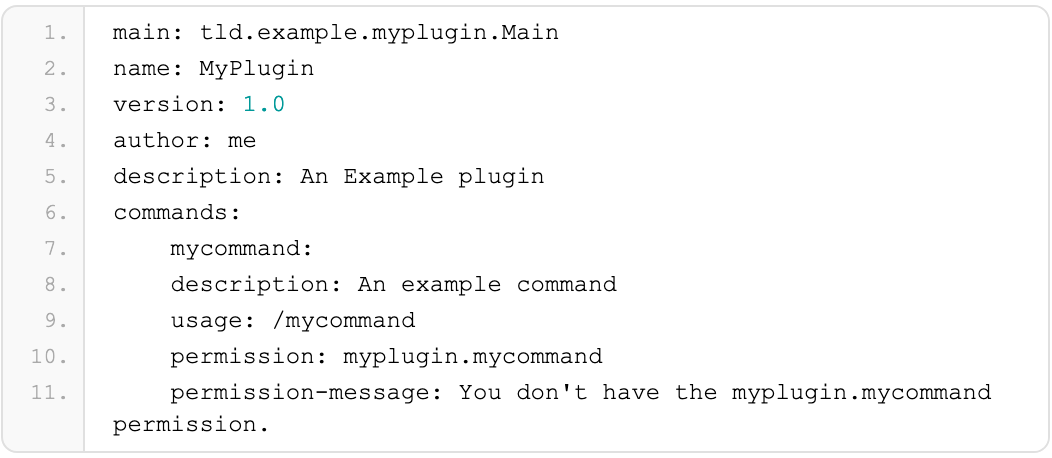
This file will be in YAML format, and describes to Spigot how to interact with the plugin. The top of the file leads off with some basic information about the plugin, and is then followed by a description of the commands which are made available by the plugin.
main: tld.example.myplugin.Main
name: MyPlugin
version: 1.0
author: me
description: An Example plugin
commands:
    mycommand:
    description: An example command
    usage: /mycommand
    permission: myplugin.mycommand
    permission-message: You don't have the myplugin.mycommand permission.
The “main:” line needs to list the package and class name of the class which is loaded by Spigot when it loads the plugin’s jar file. “version”, “author”, and “description” are human readable, and shown to the user by the /plugins and /help commands.
The “commands:” block should contain one line for each command you implement. If it’s not listed here, Spigot won’t send the command to you when users use it.
Within each command’s block, the “description” and “usage” sections are shown to the user when they use the /help command. The “permission” line describes which permission grants access to the command. “permission-message” is shown to users who don’t have permission to use it if they try to. The “permission” should start with the name of the plugin, a dot, and then an arbitrary permission name. You can also borrow another plugin’s permission or a core permission. For example, if your plugin adds additional features to MultiWorld you could require “mw.admin” permission or so forth. You can leave out this line if you want it available to all users.
Create your build script
To be able to install the plugin into Spigot, you need to create a JAR file (Java ARchive). You can use File -> Export -> Java -> Java JAR to create it, but then you end up having to specify which files to include every time. In the long run, it’s easier on you to set up Eclipse to automatically build it. So in this step we’ll be creating a build script that defines the contents of the JAR file so that Eclipse can do that.
- Go to File -> New -> File
- Choose the top-level folder (the name of your project)
- For File name enter build.xml
- Click Finish
It should open in the editor.
Paste in the following:
< ?xml version="1.0" encoding="UTF-8"?>
<project name="MyPlugin" default="makejar" basedir=".">
    <target name="makejar" description="Create a jar for the project">
        <mkdir dir="target"></mkdir>
        <jar destfile="target/${ant.project.name}.jar">
            <fileset dir="bin"></fileset>
            <fileset file="plugin.yml"></fileset>
        </jar>
    </target>
</project>
Where it says “MyPlugin” at the top, you’ll want to replace with your project name. Also, WordPress adds a space between the < and the ?xml in the first line because it looks too much like the syntax used to start a php code block. You’ll need to remove that space for the file to be valid.
Tell Eclipse to use your build script
- Right-click (control-click or two-finger-click on Mac) on the project name and choose Properties.
- Choose Builders on the left side.
- Click New…
- Choose Ant Builder and click OK
- Set the name to
Make JAR - For Buildfile, enter
${project_loc}/build.xml(literally, including the $ and the braces) - Click the Refresh tab
- Checkmark Refresh resources upon completion
- Choose The project containing the selected resources
- Switch to the Targets tab.
- Click on Set Targets… next to each of “Auto Build” and “During a ‘clean'” and just click the OK button on the resulting dialog.
- Click OK to close out of the Edit Configuration window.
- Click OK to close out of the Properties window.
At this point you should have a working project, and any time you make changes to anything in your project, it will automatically rebuild the plugin’s jar file in the target directory. As long as you’ve been saving your changes, it should always be up-to-date with your code.
Start Coding
If you’ve followed the above instructions up to this point, you now have a working plugin file which does absolutely nothing, but has all of the necessary framework.
Oh, one more thing.
The plugin.yml file included a description of a command just to use an example of how to put that in the plugin.yml file. I would be remiss if I didn’t also give you the sample code for actually handling that command. That goes in Main.java by adding an onCommand() handler function. Your final Main.java would look like this:
package tld.example.myplugin;

import org.bukkit.command.Command;
import org.bukkit.command.CommandSender;
import org.bukkit.plugin.java.JavaPlugin;

public class Main extends JavaPlugin {

    @Override
    public void onEnable() {

    }

    @Override
    public void onDisable() {

    }

    @Override
    public boolean onCommand(CommandSender sender,
                             Command command,
                             String label,
                             String[] args) {
        if (command.getName().equalsIgnoreCase("mycommand")) {
            sender.sendMessage("You ran /mycommand!");
            return true;
        }
        return false;
    }

}
Additional Resources
Spigot Plugin Development Page
Spigot API Reference
UPDATED 2016/05/06: Still works in 1.9, so updated references accordingly. Fixed step 6 in creating the project to use the shaded version of the API file. Thanks to several people in the comments for pointing it out.
UPDATED 2017/02/21: I haven’t had a chance to try it myself recently, but multiple people have said in the comments that this still works in 1.11.x, so I’ve updated the references accordingly.
UPDATED 2019/07/13: Likewise. Haven’t tried it myself, but people are saying it still works in 1.14.x in the comments, so updating the title and references. Also added a note about YEdit being gone from the Eclipse Marketplace.
UPDATED 2019/07/22: Looks like WordPress finally broke the syntax highlighter plugin I’ve been using that hasn’t been updated in 4 years, just replaced it with a Gutenberg-compatible one and attempted to fix the formatting of the code. Build.xml in particular was completely hosed, it should be fixed now.
Hey, I will try this out. Hopefully it will work!
Is there a way we can use variables and how to change And add to them? I might look forward on coding an economy plugin!
– Teeson
When you lay the steps out to make a Bukkit plugin like this it ain’t too hard, seems a little daunting at first but Eclipse is pretty easy to get used too
So I have a problem, after I try to compile BuildTools.jar (I used git&bash here like it was advised in a youtube video StormCoreFilms) I get an error:
Applying: Skeleton API Implementations
Applying: Obfuscation Helpers
fatal: sha1 information is lacking or useless (src/main/java/net/minecraft/server/MinecraftServer.java).
Repository lacks necessary blobs to fall back on 3-way merge.
Cannot fall back to three-way merge.
Patch failed at 0004 Obfuscation Helpers
The copy of the patch that failed is found in:
C:/Users/Erik/Desktop/New/Spigot/Spigot-Server/.git/rebase-apply/patch
When you have resolved this problem, run “git am –continue”.
If you prefer to skip this patch, run “git am –skip” instead.
To restore the original branch and stop patching, run “git am –abort”.
Something did not apply cleanly to Spigot-Server.
Please review above details and finish the apply then
save the changes with rebuildPatches.sh
Error compiling Spigot, are you running this jar via msysgit?
java.lang.RuntimeException: Error running command, return status !=0: [bash, applyPatches.sh]
at org.spigotmc.builder.Builder.runProcess(Builder.java:517)
at org.spigotmc.builder.Builder.main(Builder.java:400)
Do you maybe know what is wrong/what I can do to avoid this error? Thank you in advanced 🙂
Hi, I don’t normally use git so idk, but you don’t need git to run the JAR. On Windows/Linux, open a terminal/cmd prompt and run “java -jar BuildTools.jar” which will compile it. 🙂
For clarification, the cmd is: java -jar BuildTools.jar
I’m pretty sure if you don’t have git already, BuildTools.jar will automatically download and install it for you. It does use it as part of the build process.
download git
Thank you for your short but very helpfull introduction to Spigot-Plugin writing. As I’m a programmer too, I really aprecciate a well written tutorial.
So thanks for writing this and giving each section the right header (So I was able to skip the unnecessary ones).
Really nice tutorial. But I believe, for the external JAR, it should be explained that it’s that the shaded version of the Spigot API JAR. Excuse me if I am wrong.
Hello! Thank you for the very helpful tutorial. However I seem to be getting a weird error on my package. I named it “wrk.cpmc.mg” and it gives me this error: “The type com.avaje.ebean.EbeanServer cannot be resolved. It is indirectly referenced from required .class files”. Thanks for any help you can provide!
Use the shaded version of the API instead at this step :
6.Choose the Spigot-API JAR file from the Spigot directory that you compiled above. Within the directory with BuildTools.jar the API file will be in Spigot/Spigot-API/target and will probably be named something like spigot-api-1.8.3-R0.1-SNAPSHOT.jar
Thankyou! After searching for an hour, your comment finally fixed my issue!
Eclipse gives me an error on the first line of code (package declaration). I have done everything like you said, so why am I getting this?
“The type com.avaje.ebean.EbeanServer cannot be resolved. It is indirectly referenced from required .class files.”
thanks man for this good infos.keep going!
Thanks, it was very useful 🙂
Very helpful, Thank you.
Epic work, this is a great concise and detailed guide.
Worked like a treat and massively appreciated the focus on setting up the environment properly, been looking for something like this for a long long time.
thanks dude
I follow your fantastic instructions, but i have only a problem: the package in the first line is underlined and it say: “Multiple markers at this line
– The type com.avaje.ebean.EbeanServer cannot be resolved. It is
indirectly referenced from required .class files
– The type com.avaje.ebean.EbeanServer cannot be resolved. It is
indirectly referenced from required .class files”
can someone help me?
Did you do the step to add the Spigot API file via Add External JAR?
same error here, and yes, I did
Yes but he needs to use the shaded version. I had this problem and the shaded version resolved it.
You need to use the Spigot Shaded build.
To find:
Build Path -> Configure Build Path
Go to Libraries
Add the spigot-api-shaded.jar, using the add external JAR tab.
To fix the “The type com.avaje.ebean.EbeanServer cannot be resolved. It is indirectly referenced from required .class filesâ€
error, you HAVE to import
spigot-api-1.9-R0.1-SNAPSHOT-shaded.jar and NOT
spigot-api-1.9-R0.1-SNAPSHOT.jar
Just hit a pretty baffling issue a bit ago where I couldn’t access Eclipse Marketplace. The solution was to add the following line to the eclipse.ini file:
-Dorg.eclipse.ecf.provider.filetransfer.excludeContributors=org.eclipse.ecf.pro‌​vider.filetransfer.httpclient4
Source and details on the error found here: http://stackoverflow.com/questions/22148782/unable-to-connect-to-the-eclipse-luna-market
This tutorial worked great! With very detailed instructions I set up Eclipse and am developing plugins within the hour. I can’t believe I ran into only a few problems!
If you get error, ““The type com.avaje.ebean.EbeanServer cannot be resolved. It is indirectly referenced from required .class files”
use the server file in the Spigot-Server folder
Spigot/Spigot-Server/target/spigot-1.9-R0.1-SNAPSHOT.jar
Hope this helps
Thanks for this! I was fighting the same battles and trying to slog through the swamp of youtube to learn this particular skill. Because of you a new economy plugin is under way. Expect to be credited as a contributor, in essence if not in actual code.
This was a very great tutorial for beginners such as myself. The question I have is where do I go from here? I want to be able to make complex and specific commands and other features. Where can I learn to do this?
Hey Dave, thanks for writing this.
In order to get Ant to auto-build, instead of using the recommended`${project_loc}/build.xml`, I had to click the Browse Workspace folder, navigate to build.xml, and use the location Eclipse provided.
I *also* had to set Base Directory to my project root.
Using Eclipse, Version: Neon Release (4.6.0), Build id: 20160613-1800
Thanks for the above info on the auto-build, I had the same problem.
Great tutorial – I completely agree with comments on the YouTube obsession. I’d much rather have things written out clearly by someone who knows what they’re talking about.
This may sound strange, but you lost me at “Tell Eclipse to use your build script”. In the first step I can’t quite figure out where it is I’m supposed to right click…
It’s the name of the project in the navigator panel on the left side of the window (the root of the tree for that project).
This helped alot but I’m getting NoClassDefFoundError on my dependancies? I’ve totally confused myself
Could you please make a 1.10.2 tutorial please 🙂
It likely hasn’t changed a whole lot, but I’ll get it updated as soon as I update one of my plugins for it. So far, mine seemed to work without recompiling, so I wasn’t in a rush, and I haven’t had time to work on it lately.
Works in 1.11 too!
Thanks Dave, I’ve always wanted learn about this stuff and you made the first steps simple enough for me!
Sorry if I wasn’t paying attention, but how do you use this plugin on a bukkit server?
If you followed all the directions, it should automatically compile the code into a .jar file into a folder named target everytime you save, and simply put this jar file into the plugins folder inside your server files.
To make it super-easy to test as I go I set up a spigot server in /target. I then set the build destination to /target/plugins. This way the newly compiled jar deploys directly to my little test server!
A couple of issues I had, the terminal command that I had to use was: java -Xmx2G -jar (then drag/drop the file there for the directory bit) and then hit return.
It created several directories and both a Craftbukkit and a Spigot jar.
Also, the new Eclipse Neon version does not look like the Eclipse you are using. I had to find Eclipse Luna, and found it here https://eclipse.org/downloads/packages/eclipse-ide-java-developers/lunasr2 which looks like what you’re describing in the tutorial. Happy to finally be able to move forward!
1.11.2 Works great. Teaching my 7 yr old how to code and he has been able to keep up with your very clear instructions. This is a better approach than videos.
Thanks.
I tried unloading spigot, and it said
“C:\Windows\Spigot>java -jar BuildTools.jar”
“Loading BuildTools version: git-BuildTools-4bf25ea-55 (#55)”
“You must run this jar through bash (msysgit)”
I have no idea what that means, or how to fix it… Please elaborate…
Running this on windows 7, not sure if that matters too much.
You probably need to install one of the unix-like shells to use instead of using the Windows command prompt. I’m not all that familiar with Windows so I’m not sure if there’s something else better nowadays, but I used to hear about people running Cygwin for that purpose.
Or, alternatively, find and download BuildToolsGUI.exe…
Download and install this, run it and a terminal like CMD will pop up. Continue as you would in CMD.
https://git-for-windows.github.io/
Hey!
This is a really great technique!
It works great!
I will be able to code plugins now!
Getting a build error at the step with the build.xml.
Error:
D:\Program Files\Eclipse\Sunburn\build.xml:1: Premature end of file.
XML:
Any help would be appreciated. Thanks!
XML disappeared in replay for some reason. I deleted space and changed the program name as instructed. Otherwise code is the same as in the tutorial.
Same problem! Please help!
hy i dont know if you will answer this but would you kindly tell me how to make like custom map like mobarena, for example when someone use /pos1 it will copy the coordinate and then they use /pos2 and copy the coordinate after that the plugin will read that 2 coordinate as an arena inside it. sorry if this not understandable sorry :3 but thank if you like to tell me how
Hello, for some reason when I put the .jar in my plugins folder, it does not work. The plugin does not show up on /plugins nor does any command from it work. My server is 1.11.2 and is part of a bungee cord network (although this shouldn’t effect it).
First tutorial that actually helped me in setting up my project. Thank you very very very much! 😀
Thank you so much for this fantastic guide! First-time setup of a new environment and API is always so daunting for me, but not with this walkthrough. Cheers!
Thanks for a great tutorial!
Unfortunately, I got the error “Unsupported major.minor version 52.0” when trying my plugin out. I suppose this is because I have java version “1.7.0_121” on my server, while it says JRE System Library [JavaSE-1.8] in eclipse.
Any idea on how to fix this?
You are probably correct. I think a plugin compiled on Java 1.7 will work in Java 1.8 but the reverse is not true. So if your Minecraft server has Java 1.7 then you probably need to get a copy of 1.7 on your development box to compile against.
Thanks for the reply!
Strange that my google virtual machine should have an outdated java version though, its freshly installed.
Any links on how to download (is it called sdk) 1.7 and set ecplise to use it would be nice, but I can probably handle it when I’m well eaten and slept 🙂
Yep, see the “Install Java” section at the top of the article here, it has the link to Oracle’s site and the reminder to make sure you get the JDK not the JRE.
Thanks! The reason my java was outdated was that I had Ubuntu 14.04 installed.
Solved this by reinstalling everything on Ubuntu 16.
Now my sample plugin works!
Followed this tutorial to the character. The plugin doesn’t load. Throws all kinds of errors.
What kind of errors? Also, I hear there’s been lots of changes in 1.12, I haven’t tried building against 1.12 yet.
Thank you so much for the walk through, its been great, and I have followed much of it, however I have an issue with the plugin.yml. I have installed YEdit, but when creating a new plugin.yml it opens a blank window, from the guide I believe this should be populated? any help on this would be great. I have clean installed everything twice to make sure I was following guide correctly but still no luck. thanks.
Nope, it starts out empty. You can copy/paste the suggested content from the guide for something to get started with though.
Hi Dave, fantastic tutorial, thanks for the help!
If I’m using an external library for my plugin, how would I add the jar file in the build.xml file? I get a java.lang.ClassNotFoundException when the server tries to execute the command using the external jar, so I’m assuming it’s not being packaged into the plugin jar in the target folder.
Thank you!
Hello! Nice tutorial. I’m wondering how to make my own imports (or packages?). I’ve seen them in numerous other plugins. Here’s an example from a plugin called Staff+:
import net.shortninja.vListener
Shortninja is the creator, so I’m wondering how he did that. Thanks!
Never mind, I figured it out.
hi all, i am unable to get the spigot file via the command prompt it states: C:\Users\Jake>java -jar BuildTools.jar
Error: Unable to access jarfile BuildTools.jar
how do i solve it?
Did you download it first? Are you in the same directory that you downloaded it to?
Where is the plugin file?
THIS GUIDE IS EPIC – TYSM, SAVED ME HHHOOOOUURS. Literally. This guide is so on-point it’s sick. Even down to removing the space in the <?xml line. And it's 100% complete with the code, yaml, and build script plus eclipse settings. Turnkey, thanks again.
I’m sorry if this is super basic, but I’m a beginner.
When I pasted in the code into the Main file that allows the plugin to utilize the command in the .yml file, it gives me some errors right off the bat.
Those being:
CommandSender cannot be resolved to a type.
&
Command cannot be resolved to a type.
The first line looking like:
public boolean onCommand(CommandSender sender,
And the second line looking like:
Command command,
What’s happening and how can I fix this?
Either your class definition for the Main class is missing the “extends JavaPlugin” or you’re missing the “import org.bukkit.plugin.java” line.
I think I have it. Is this correct? I think that’s what I’m supposed to have, but as I said, I am a very new.
import org.bukkit.plugin.java.JavaPlugin;
public class Main extends JavaPlugin {
@Override
public void onEnable() {
}
@Override
public void onDisable() {
}
Yes, that looks correct.
Ah, I was still confused because it was not working. But I totally forgot to import CommandSender and Command. I was pretty tired when I was trying to fix this and I have 0 experience, so I got really confused. Thanks for your help man 😀
I’m trying to create the plugin.yml file. It just comes up with a blank editor. All of those things mentioned above isn’t there. Help?
It’ll be blank when you create it. You have to add that stuff, it won’t already be there.
3 years later and i’ve finally figured out how to make ant automatically include version number in build file.
1) In your build.xml include:
2) add ${plugin.version} to your destfile name, eg:
3) Thats it! Now ant will automatically build your jar as Project_Name-0.1.jar or whatever version you set in your plugins.yml
it cut out my code (replace { with )
1) In your build.xml include:
{property file=”src/plugin.yml” prefix=”plugin”/}
2) add ${plugin.version} to your destfile name, eg:
{jar destfile=”target/${ant.project.name}-${plugin.version}.jar”}
3) Thats it! Now ant will automatically build your jar as Project_Name-0.1.jar or whatever version you set in your plugins.yml
In the part where we choose our Superclass, nothing come up when I type in JavaPlugin, what do I do then?
You probably missed the “Add External JARs” step in the “create the project itself” section. If the Spigot JAR got added, JavaPlugin should find something.
I did “Add External JARS”, but it still will not show up.
Should I just type the “org.bukkit.plugin.java” in the Superclass name section?
Certainly worth a shot.
I much prefer learning things from text rather than YouTube videos so I definitely agree with you Dave! Thanks for this tutorial, explained nice and simply 😀